Microscope Viewing Well
Leveraging modularity, and the strengths of a variety of materials to design and create a system capable of viewing bacterium in solution safely over a microscope objective lens
The Topic of Research
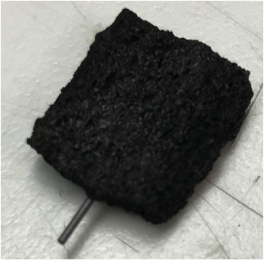
We were seeking to understand how food waste could be leveraged as a solution to a lack of safe drinking water in low and middle income settings across the globe. Using carbonized bread as the conductive material for our anode and cathode, and minimal energetic inputs (~3V), we wanted to see if we could visualize the migration of E.Coli (with its negatively charged lipid bilayer) from the anode to the cathode, and secondly if the adsorption of the E.Coli would be sufficient to kill the bacteria, thus disinfecting the water

Carbonized (Burned in Absence of Oxygen) Bread with Graphite lead for Power Source Connection

Rough Draft of Experimental Setup: Cathode and Anode in E.Coli Solution on top of Microscope Stage
Areas of Analysis in Our System
It was critical to analysis of our system to understand the behavior of E.Coli at any part of our system. We chose to distinguish three regions for analysis.
Region 1: On cathode side - do we see masking effects, or still impacted by anode?
Region 2: In between the cathode and anode - does pull of cathode plus push of anode lead to loss of E.Coli cell membrane integrity (disinfection)?
Region 3: On anode side - do we see masking effects, or still impacted by cathode?
Research Questions Informing Design of Viewing Well
What does the velocity distribution of bacteria look like relative to their initial distance from the electrodes?
What effect does varying the distance between electrodes have on kill %? What is most efficient separation?
Is there evidence of a saturation point for the electrode, where no more E.Coli ions can be adsorbed even while voltage being supplied?
What Our Housing Needs to Accommodate for these Qs
System needs to allow for loading of E.Coli into Regions 1, 2, or 3 for analysis
System needs to be able to test varying distances between cathode and anode
System needs to be able to be loaded with E.Coli while electrodes are live - to see if cathode saturation is a factor
Additional Design Considerations became clear through analysis of the experimental setup on the electron microscope

Inspiration for Press Fit Design
The lead researcher made use of a press fit design with acrylic walls pressing on ecoflex rubber for timed disinfection tests at varying voltages. The ecoflex rubber provided the recess into which E.Coli solution was loaded. Perhaps an extension of this design, with a glass slide for microscope viewing, will make it viewable on a microscope stage, using the press fit to prevent any leaks or spills
These considerations informed our first viewing well design, leveraging modularity, transparency for microscope viewing, and a press fit on rubber walls to ensure solution would not leak onto the microscope objective lens while minimizing working distance for clear viewing

This setup allowed us to get our first image: fluorescent stained bacteria can be seen adhering to the surface of the cathode
Setup in Practice
Stability of the system upon the stage was an early concern, but the modular design allowed for the adhesion of acrylic “wings” that held the system securely in place
Modular Design Pays Off
Although this well produced our first images, we realized that irregularities between pieces of carbonized bread, along with its porous nature, were making it difficult to work with in terms of consistent quantitative results. It was near impossible to determine the cathode and anode separation as the pieces of bread were curved from the carbonization process and would not stand up straight. We decided to backtrack from carbonized bread, and rather inspect the effects of the charge itself on our negatively charged E.Coli by using rectangular shaped graphite as the conductive material for our cathode and anode
Because of our choice of a modular design, this simply meant a redesign to our acrylic top and middle piece. To allow for less time switching between full housings, and empowered by the more regular shape of graphite, 3 grids were cut by laser cutter to allow for testing of three different Region 2 gap sizes using only one housing.


